Colorado landscapes: Mesa Verde - Cliff Palace

Cliff Palace  

I grew up in an over 1000 years old city in Germany. My home town Bautzen was mentioned on a piece of paper for the first time in 1002. Many of the oldest buildings and towers are way over 500 years old. I realized it is not that old  if you look at Mesa Verde.  ;-)

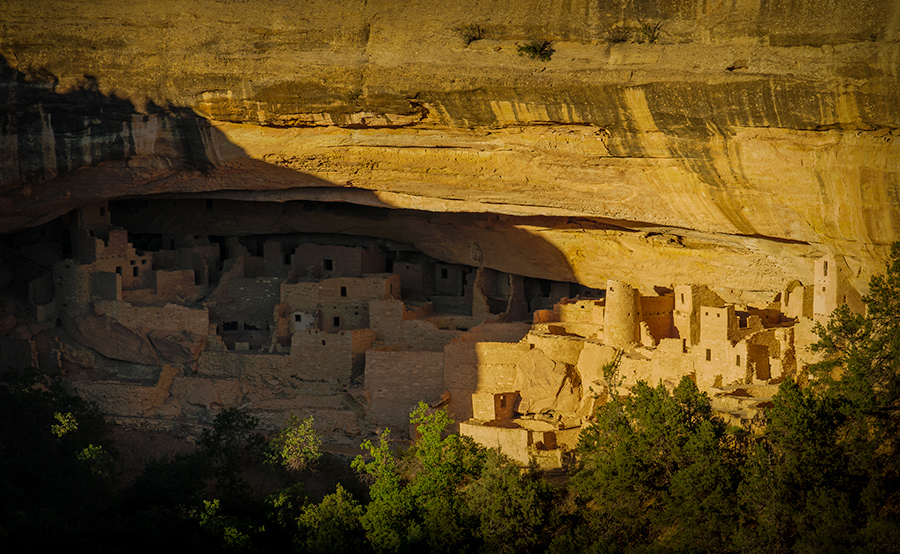
Most of the cliff dwellings were built from the late 1190s to late 1270s. However, by about 1300 Mesa Verde was deserted. The reasons for the migration of the Ancestral Pueblo people are unclear and several theories offer reasons for their migration (source: Mesa Verde NP brochure). It is just great that these very old structures still exist, that they are preserved, and that they are protected for future generations.

We had to be patient to make some images of Cliff Palace, one of the community centers with about 150 rooms. We did not like the light during the day and so we came back to the overlook across the canyon in the evening. The light was gorgeous at about 6:45PM. I bracketed five shots for each image, each shot one f-stop apart. For this photo I finally took the 3 shots on the darker side and merged them in Photoshop into one 32-bit file. Bringing the 32-bit tiff-file back into Adobe Lightroom gives you a much wider range to work with on highlights and shadows. I also tried to merge five shots into an HDR image and tone mapped it, but I do not like this kind of a look, not even with a very subtle tone mapping applied. So, what you see here is just a “pseudo-HDR” but I like it so much better. I have no problem to imagine that the sunset over 800 years ago was exactly the same, except Cliff Palace was probably busier at this time of the day...

Indoors with 32-BIT High Dynamic Range (HDR)

St. Vitus's Cathedral  

I like to share another image that I created with the same technical means I have described yesterday here in the blog. Indoor pictures with great architecture can really benefit from HDR, with or without ton mapping, as you can see in this photograph I made inside the St. Vitus's Cathedral in Prague, Czech Republic. There is just no way that you can catch the details in the sculptures without blowing out the highlights in the stained glass windows with a single exposure. You sacrifice one part for the other if you only make one click. By blending a series of exposures (here I used 4) into one 32-BIT image I was able to expand the dynamic range and the result is much closer to what our eyes have really seen in this wonderful cathedral. This image is part of a special project I'm working on at the moment and that I will come out with hopefully soon. So please stay tuned...


Digging into history using 32-BIT HDR

Wall Arch  

The photo I show you today was made April 18, 2008. You can't make the same picture anymore, not even if you go to exactly the same place at Arches National Park in Utah. This was Wall Arch, one of the numerous arches that gave the park its name. Wall Arch collapsed 109 days after I made the image. So what you see here is history.

We had only two days in the National Park and not every photograph was made during a time with good quality light. Any time after 8:30AM we had to deal with high contrast scenes and harsh light. I shot many images with five different exposures in order to overcome the limitations of the dynamic range in the digital camera, at that time my Nikon D200. Back home it was a time consuming process to layer the pictures on top of each other and paint with layer masks to reveal only the parts of each photo that I wanted in the final image. I remember it took me at least three nights to do that, partly due to the fact that my Photoshop skills were still very limited. Needless to say that I was very proud about my accomplishment. High Dynamic Range (HDR) software was not available or at least was not known to me at that time. The photo below was the result.


Wall Arch 2008


Because of its historic value, that it has at least for me, I wanted to redo this image with today's software and better technology. This time I used a 32-BIT HDR method that I learned a little while ago in Matt Kloskowski's blog "Lightroom Killer Tips" (see the link for this blog in the side bar on the left hand side). Starting in Adobe Lightroom I merged my five original RAW files into HDR Pro in Photoshop. From there I just saved the picture as a 32-BIT tiff-file back into Lightroom. What you will find is that the range of the Exposure slider has changed from ±5 to ±10, giving you a much wider range to work with shadows and highlights in your picture. The 32-BIT tiff-file gives you a humongous dynamic range to work with in comparison to the usual 16-BIT or 8-BIT we have at our hands.

I prefer a very natural look in my images and this method, without any ton mapping, works very well for my style of photography. But here is the best, it only took me about five minutes to create the final image from my five bracketed shots and can still use the tonal range of all five shots together.

As you can see, I cropped the new picture slightly just because I like it now better this way. Can't really say anymore, "I will do it right in camera next time I'm there".... ;-)