Friday night "conclusions" ;-)

Ready for take-off  

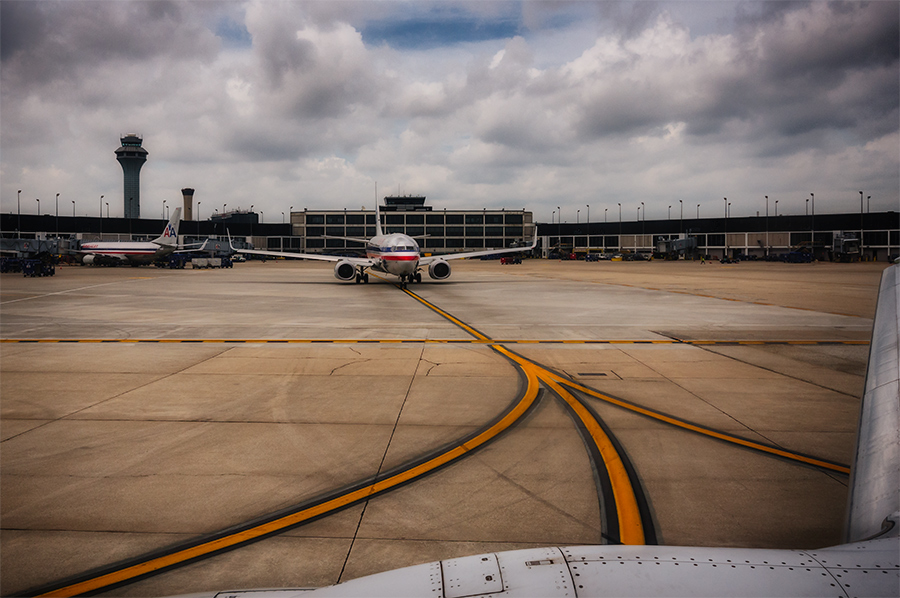
What do have these two photos in common? Not much, they weren’t even made the same day, except they were taken from the same vantage point. But, let me explain…

The first photo was made right before take off at the Chicago O’Hare Airport last Tuesday. The sky was gray, except for a few small blue slivers. While looking out the window I could see this composition coming just a second before. I made the click and I like it. All the lines lead the eye to the airplane. The clouds, the terminal building in the background, and of course the painted lines on the concrete. However, the overcast made the image look “blaahhh”. Some local saturation and overall contrast improvements in Adobe Lightroom and NIK Color Efex Pro 4, plus adding a “glamour glow” effect, and a slight vignette spawned the final result.

Storm clouds over the desert


The second photo was made Thursday on my way back from Los Angeles to Chicago. It doesn’t happen very often but I had exactly the same seat in a Boeing 737-800 as two days before. It wasn’t exact the same airplane but the window was as dirty as on the way to LA. As I said, same vantage point… ;-)

But what a difference, the light was great and coming from behind the plane as we flew east. There were some beautiful storm clouds to the south. This is nothing extraordinarily but the key for this shot was again composition. The eye may wander between the puffy clouds in the foreground and the AA-logo with the reflection on the wing but it will always return to the interesting cloud formation that was illuminated by the setting sun.

No, it doesn’t need a big camera and lens. You can make a similar image with the camera you probably have always with you, your phone. You can’t change your position much, the pilot takes care for that, but watching the scene, the light, and the lines that unfold in front of your eye will lead you to the photo you may have always envisioned…


Clean up or not to clean up?

Hot Rod  

It looks like the only thing I have done lately was nature photography but I shoot other things too, just don’t show much of it in my blog here. Today I show you a couple car shots I made earlier this month. The Hot Rod Power Tour came through Dubuque almost two weeks ago and there was another event a day later in Dubuque with vintage cars on display. I don’t really care how old they are and what the whole technical background for each car is if they are just esthetically pleasing. For my wildlife photography I hardly clone out things of an image in Adobe Lightroom or Photoshop. This is reduced to very small cosmetic corrections in the background at the most. This is just my way to work with wildlife.

Ford Model A


When shooting cars that are on display at a show there is always some “junk” in the background that distracts from the subject. In this matter some flags, fence posts, wires, and even a motorcycle had to go. It’s a different game if someone uses the photos to tell a story about the event itself. What I call junk can become part of the story telling. I just went for the beauty of the cars. Anything else is just distracting and that’s why I have no problems to clean up a picture for this kind of photography.


Digging into history using 32-BIT HDR

Wall Arch  

The photo I show you today was made April 18, 2008. You can't make the same picture anymore, not even if you go to exactly the same place at Arches National Park in Utah. This was Wall Arch, one of the numerous arches that gave the park its name. Wall Arch collapsed 109 days after I made the image. So what you see here is history.

We had only two days in the National Park and not every photograph was made during a time with good quality light. Any time after 8:30AM we had to deal with high contrast scenes and harsh light. I shot many images with five different exposures in order to overcome the limitations of the dynamic range in the digital camera, at that time my Nikon D200. Back home it was a time consuming process to layer the pictures on top of each other and paint with layer masks to reveal only the parts of each photo that I wanted in the final image. I remember it took me at least three nights to do that, partly due to the fact that my Photoshop skills were still very limited. Needless to say that I was very proud about my accomplishment. High Dynamic Range (HDR) software was not available or at least was not known to me at that time. The photo below was the result.


Wall Arch 2008


Because of its historic value, that it has at least for me, I wanted to redo this image with today's software and better technology. This time I used a 32-BIT HDR method that I learned a little while ago in Matt Kloskowski's blog "Lightroom Killer Tips" (see the link for this blog in the side bar on the left hand side). Starting in Adobe Lightroom I merged my five original RAW files into HDR Pro in Photoshop. From there I just saved the picture as a 32-BIT tiff-file back into Lightroom. What you will find is that the range of the Exposure slider has changed from ±5 to ±10, giving you a much wider range to work with shadows and highlights in your picture. The 32-BIT tiff-file gives you a humongous dynamic range to work with in comparison to the usual 16-BIT or 8-BIT we have at our hands.

I prefer a very natural look in my images and this method, without any ton mapping, works very well for my style of photography. But here is the best, it only took me about five minutes to create the final image from my five bracketed shots and can still use the tonal range of all five shots together.

As you can see, I cropped the new picture slightly just because I like it now better this way. Can't really say anymore, "I will do it right in camera next time I'm there".... ;-)


Creative hole

Sun beams

I have been in a creative hole during the last week and as a result haven't made any new photos. It was hot and humid again and maybe it is just the weather that kept me from going outside and explore things in nature or somewhere else. Coincidently "The Grit", a podcast from Kelby Media Group that I download and watch every week, had as their discussion topic "When Inspiration Fails You" (episode 63). Couldn't be a better time for me to watch what other photographers had to say about this. Well, I'm not alone. It seems that even some of the most creative professional photographers have sometimes a period without any inspiration. Check it out here if you like: http://kelbytv.com/thegrid/

Not having any new images helped me to work on the backlog I have with my catalog. I made a lot of clicks this year already but the busy travel schedule recently prevented me from working on some of the pictures.

This photo is still from last Sunday. It was taken near the Mines of Spain, a nature area south of Dubuque, IA. I underexposed it by one stop in order to catch the sun rays coming through the clouds. I had to bring back carefully some of the light in the foreground in  Lightroom because I did not have any of the split grade ND filters with me. I could have done more for the detail but I wanted to give the scene a "painting-like" feeling. I applied my changes, including the usual sharpening, very subtle in order to get the result I had envisioned.

New portfolio - Landscape photography

Storm

Even if I do not have the chance to go out shooting because life dictates something different, I still try to work every night on my images or maintain my photo library. The recent update of Adobe's Lightroom software (we are now at LR 4) made me digging out some photos and redo the whole post process. Thanks to shooting always in Raw I can start from scratch with any file in my library. Adobe has done some great refinements in the Develop Module of LR4. In combination with NIK's Color Efex Pro 4 I have now some tools in my hands that have never been so powerful and at the same time subtle before.

It was time to think over my landscape portfolio. I kicked out some images, reworked some others, and added some new photos. If you like to have a look at the results, feel free to click at the left hand side on the PORTFOLIO bar or just right HERE.

Lightroom 4.0 Beta - I'm already hooked...

Clouds
Nikon D300s, Sigma 150mm / f2.8 APO EX DG HSM

As many photographers these days who rely on Adobe's Lightroom software for all or some of their post processing I have downloaded their Beta-version of LR 4. It is out for trial and testing since a few weeks. If you are not familiar with this software but you would like to give it a trial, this is your chance now. The Beta-version is free but will expire March 31, 2012. It is expected that then the final version will replace the Beta-version. You can find it on the Adobe website.

I have used Lightroom since version 1.4 and I still think it is great. I use other software and plug-ins for my workflow as well (like Adobe Photoshop CS4 and most of the NIK plug-ins), but every post process of an image starts in LR. With every new version released this product became better every time. Critical things, like noise reduction and pre-sharpening of a RAW file, have seen big improvements over time. If I work with an image for a second time that may have been processed before some time ago (five years in digital photography are a very long time!!), I usually start from scratch and use the latest RAW converter and rendering engine that comes with Lightroom. Having a much better understanding about the post process now, plus better software leads always to a better result. Well, almost always, an image that is not sharp from the very beginning will still not result in a tack sharp photo. And I have plenty of them… ;-)

Beside many other new features Lightroom 4.0 Beta has some changes in the develop module. Some sliders are now differently named and  seem to have a much more subtle response. I used this photo of some actually pretty dull looking clouds over our neighborhood to try out different settings. I ended up with this contrastive look. It is not just one slider, it is a carefully chosen combination of several settings that boosts the contrast and luminosity in this picture. Give Lightroom 4.0 Beta a trial, you may get addicted… ;-)

Tool for file organization, maintenance, and analysis

It doesn't happen very often that I don't find the time for making any click during a whole week. Too many other things had to be taken care of during the last few days. I have to admit that I wasn't really sad about this because I found the time at night to do some maintenance in my picture data base. I'm a strong believer in a good file organization and I assign keywords to all of my images. Not only that finding a particular photo is so much easier, I believe it also helps me to analyze my work by comparing older shots with my actual creations. For instance, before I went in November for the third time to the Bolsa Chica Wetlands in Southern California I viewed my photos from the previous visits carefully. With a simple click in the keyword data base I can pull up every photo from a particular bird species. It helped me to see where I have room for improvement and to set new goals for the next shooting event in the same area.

Leaves in a creek

During my nightly sessions this week I realized that I had neglected nature close up shots during our time in the Smokies this fall. A single click on the keyword "Fine Art" made me aware of this fact. This photo with the leaves in the crystal clear stream and the sun reflected from the minerals at the bottom of the creek was one of the few.

I use Adobe Lightroom for organizing my photos since four years now (version 3.6 was just released a few days ago). It's library module with all the features for searching, selecting, and file handling is awesome. Lightroom has many strongholds that I like but the library module is one of the best tools in my digital darkroom. If you have someone who is still asking for your Christmas wish, hey, here is a gift idea… ;-)

Let's talk about workflow

Return from Clingmans Dome
Nikon D300s, Nikkor 24-120, f/4

Probably most people that visit the Great Smoky Mountains drive at least once up to the mountain ridge and walk the last mile to Clingmans Dome (6643 ft / 2025m), the highest point in the National Park. We did too, even if we prefer the quieter places in the mountains. Lots of tourists up there! It is nice to be on the watchtower and have a view in all directions but I found the more interesting views on a little lower elevation along the roadside. Luckily there are many pull-outs along the roads in the Smokies that allow you to park the car and shoot your pictures safely. The clouds moved fast and the sun rays let the leaves glow whenever they touched them. It was just gorgeous.

If you are interested, here is the workflow I used for this image:

I dialed in -1EV exposure compensation to bring the clouds to their full potential and not to have any highlights blown out at the right hand side. I used a graduated filter and the adjustment brush in Lightroom 3.4 to bring back some of the exposure in the foreground. Next I used the tone curve to enhance the overall contrast a little. This is followed by the usual capture sharpening, necessary for any RAW file. No color enhancements for this picture! Next I switched to NIK Color Efex Pro 4 (I have version 3 but just used the free 15-days-trial on the new version) and worked with the tonal contrast filter. As always, my last steps are done in Adobe Photoshop. I have a special downsize algorithm that also serves to sharpen the image for the web. I learned this step from the book "Image Sharpening with Adobe Photoshop, Camera RAW, and Lightroom" by Bruce Fraser and Jeff Schewe. A book that I can highly recommend to anybody who tries to understand image sharpening. Before I save a jpeg for the web I apply my watermark. Most of the steps in Photoshop are done by pre-recorded actions and require only one click to execute them. Done deal!

How long for post process?

Iowa landscape
Nikon D200, Carl Zeiss Distagon T* 35 mm f/2 ZF

Here is another picture from last weekend's "driving-around-and-looking-for-clouds-tour". Landscape photography isn't always easy in Iowa, especially in the summer, but if the big clouds move in or out you have your chance for some drama, even if you just stand between corn and soybean fields… ;-)

This time it was not done with HDR processing and it is just a single image. I did my usual adjustments in Adobe Lightroom. I increased the highlights with the tone curve so that the white in the clouds showed its full potential. After the export to Photoshop, where I do usually the fine tuning and downsizing of the picture for the web, I realized that the image was still a little too hazy for my taste. Bringing up the contrast in the clouds with an adjustment layer and a layer mask took care of the problem. I think I still take too much time processing my images in post. I guess I still have to fix too many things that aren't done correctly while taking the image. But it's getting better. This one took less than five minutes to finish and to output three different copies (1x original full size, 1x jpeg 948 px long for my web gallery, and 1x jpeg 620 px long for this blog). It would be nice to know how long it takes you to process a RAW file and to create an image that you like. I'm just curious…


Nature clicks #33 - Eastern Black Swallowtail

Eastern Black Swallowtail 1
Nikon D200, Sigma 150 mm f/2.8, 1/320s, f/4, -1 EV, ISO 200


Today we got the rain that nature needs so much here at the moment. As a result and also because of a busy working schedule I have not made a single click today. A big advantage of working from a home office in the middle of the woods is the fact that I can have my camera always nearby and ready for shooting. Usually it is mounted on a tripod near the door. Quite often I just run outside if anything interesting shows up in the yard or the surrounding woods. Yesterday morning, while filling the hummingbird feeders, I saw the first swallowtail butterfly of this season. It was a male Eastern Black Swallowtail, just sitting near the ground and still very sluggish. This gave me all time in the world to go down on my knees and make two dozen clicks.


Eastern Black Swallowtail 2
Nikon D200, Sigma 150 mm f/2.8, 1/125s, f/5.6, -0.5 EV, ISO 200


Today, when I looked in my image catalog, I found out that I haven't made a good picture of a Black Swallowtail since 2007. I manage my photos with Adobe Lightroom and I apply keywords to each single image. It is sometimes time consuming, but this is when it pays back to use keywords. It is so much easier to find photos about a particular subject and allows a review and learning from older images. Yesterday's photos of the Black Swallowtail will replace the old picture in my IOWA WILDLIFE GALLERY (which needs an update anyway ;-)  ).