Old little project and lessons learned from

Visitors of my photo galleries at phase.com may know that I have a little gallery with images of sign boards. I started it in 2007 when I became serious with digital photography and after I bought my first DSLR. I like sign boards. They add charm to a business or a street and many are artfully crafted.


Sign board # 68
Seen in East Sound on Orcas Island, Washington


Beside having always fun to look out for them, taking pictures of sign boards has taught me a lot for my photography. I learned about white balance, exposure compensation, depth of field, perspective, and many other technical aspects of taking pictures. I learned about the importance of background for an image. With sign boards it can be quite a challenge, because you can't always choose your background and perspective. They usually hang high up above the store front and I'm like most people, I don't carry a ladder with me  ;-) . If you visit a city during a period of very flat or very harsh light and with no opportunity to come back at a different time, this will add another challenge if you want to get the image anyway. And that leads directly to what comes after the picture was taken. Working on my sign board images in Adobe Lightroom or Photoshop taught me a lot about dealing with the flaws, like over or under exposure, white balance issues, unwanted reflections, you name it. Sign boards are an ideal subject to experiment with different ways of sharpening and noise reductions. They helped me to create a processing work flow that works for me. When I looked at my older pictures (yep, four years are a long time in digital photography ;-)  ) I thought sometimes about redoing them again in post. Would be no problem since I always shoot in RAW. But it is what it is. I will only exchange them in my gallery if I come home with a new and better image.


Sign board # 56
Seen in my home town Bautzen, Germany


No, it doesn't have to be sign boards. I can think of many other little photography projects that would be fun to focus on over a longer period of time. The sign boards helped me to learn and to deal with the technical aspects of my photography. If you like to see the complete collection, please feel free to click HERE, and let me know what your little or big project is.


Old No. 6

Three weeks ago I made my first steps with NIK's Silver Efex Pro (click the tag "NIK software" below to see my earlier posts). Yesterday I downloaded the new version Silver Efex Pro 2, and of course, started working with it immediately. More presets, more sliders, more ways to give your image the look you have in mind. A powerhouse for B&W photography!


Old No. 6
15 mm, 1/80 sec. @ f5, ISO 200, -2/3 EV,


This picture of "Old Number 6" was taken during our last year's vacation tour through the Cascade Mountain range in Washington. This steam locomotive is located in Newhalem along the North Cascade Highway. "No. 6" carried supplies and equipment to built the dams and powerhouses for the Skagit River Hydro-electric project, which supplies the City of Seattle with low cost electricity. The steam engine was used until 1954 and has been restored to operating conditions in the 1970's by the "Skagit River Railway Volunteers".

I used a sepia tone for this picture because I believe this style harmonizes with the subject and reflects  the age of that wonderful looking "No. 6" very well.


More light - BETTER BEAMER flash extender

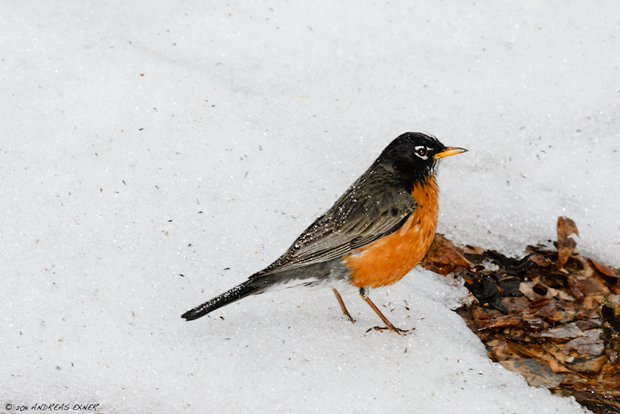
We haven't seen the sun here for five days. The sky is covered with grey clouds every day. There are still patches of old snow on the ground, and they look, of course, grey as well. But we also can see the first signs of the upcoming spring. A big flock with hundreds of American Robins is foraging in the woods around our house. We have seen them actually several times throughout this winter. It seems they don't migrate much further south anymore. But their appearance is different now. They have started singing and make a lot more noise.

American Robin
Nikon D200, Sigma 50-500, SB600, Better Beamer flash extender


The natural light in this kind of weather is miserable in the woods and not enough for a sharp image of the Robins. I just acquired a Better Beamer flash extender for exactly this kind of a scenario, where I'm depending on a focal length of 400 -500 mm and the reach of a normal flash is insufficient.

It was raining just before I started shooting and the flash is reflected in the rain drops on the bird's feathers. Not that I really like it, because it makes the flash too obvious, but at the other hand, the sparkling of the little rain drops helps to tell the story about spring, which is hopefully not too far away anymore.

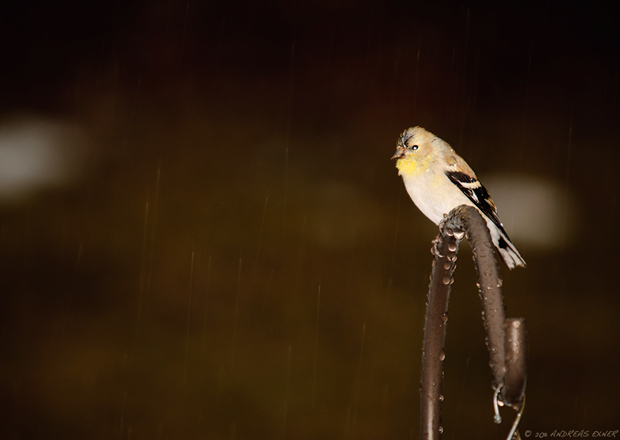
Goldfinch in the rain
Nikon D200, Sigma 50-500, SB600, Better Beamer flash extender


For this first test I had the flash directly mounted to the hot shoe of the D200. You can tell by looking at the picture of the American Goldfinch sitting in the rain that it may need a different approach. I don't like how the eye of the bird turned out. I need to do more tests to see how a different flash-to-camera angle would improve the outcome. What else is wrong with the finch image? The picture was shot using front-curtain sync flash, which makes the rain drops looking unnatural. It seems they move in the wrong direction. I usually shoot rear-curtain flash but had changed my camera settings for some reason. Oh well, …next time!

So far, I like how the Better Beamer flash extender really increases the reach of the SB600 flashlight, how the colors start to pop, and for this particular weather, make the grey finally disappear.


Nature clicks #14 – Bald Eagles again

Touch down
1/1000s, f6.3, -1/2 EV, ISO 100, 420mm (630mm FX), spot metering, shutter priority

All the snow we had since early December is rapidly melting away. I wonder how long the Bald Eagles will still be present at the Mississippi River in great numbers. I will hopefully find out this weekend. For now another shot from last weekend. The color of the water was amazing. No color enhancement done at this photo either.

Nature clicks #13 - Bald Eagles

Mississippi dam #14, near Le Claire, Iowa, is my favorite spot to watch and photograph Bald Eagles in the winter. I have been there several times this season and always got skunked. It seemed, that the clouds were always just waiting for my arrival, and as soon I had my tripod in place they moved in front of the best light source we have. Taking pictures of birds against grey sky just sucks.

Juvenile Bald Eagle with fish
1/1500s, f6.3, -1/2 EV, ISO 100, 420mm (630mm FX), spot metering, shutter priority

Finally last Sunday I got awarded for driving down south the usual hour and a half. The blue sky gave the water a very vibrant color and of course, was perfect for shooting eagles in flight.

It is so much fun to watch especially the juveniles hunting for fish. Some of them have still a lot to learn because they drop them quite often. If it was a dead fish, that someone had thrown in the water, the photographers got a second chance to capture the moment when the young eagles tried to grab it. I'm like these young Bald Eagles. I'm happy to have this second chance since some of my pictures are still out of focus.

Bald Eagle in flight
1/1500s, f6.3, -1/2 EV, ISO 100, 320mm (480mm FX), spot metering, shutter priority

However, in comparison to last year I have many more keepers on the memory card. There are reasons for. First, I'm using a gimbal head on the tripod instead shooting with a ball head. Huge difference! It is much easier to track the birds in flight. Second, I have watched the eagles many times and learned so much more about their behavior. Yep, even the days with overcast were time well spent at the river. The movements of the Bald Eagles seem to become more predictable for me and that helps to be prepared for what 's coming next. This little extra second gives time enough to correct the EV or change the focal length slightly.

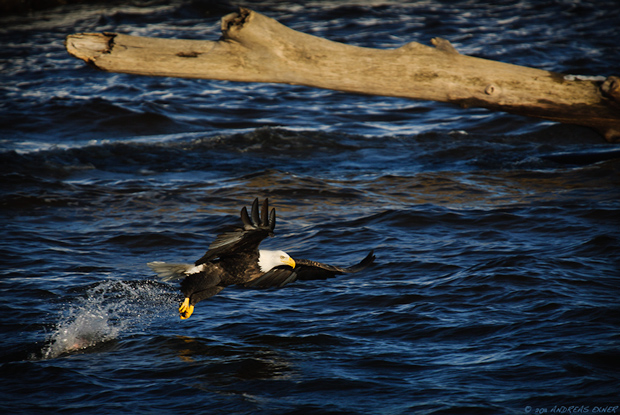
Catch!
1/1000s, f6.3, -1/2 EV, ISO 100, 420mm (630mm FX), spot metering, shutter priority

This picture was taken in the very late afternoon sun. You can tell by the color of the water. Did this guy get the fish? You bet!

New portfolio

New portfolio

In my home country Germany we have a saying: 'Gut Ding will Weile haben', which means about 'Good things need time'. I started my blog a year ago and now, a year later, finally was able to remove the line 'under construction' from my photography portfolio page. All three slide shows are now up and running. If you like to have a look, here is a SHORTCUT.

Art outside

Sculpture GOD BLESS AMERICA
Nikon D200, SIGMA 10-20 mm, f/4.0-5.6 @ 10mm


The Dubuque Museum of Art here in Eastern Iowa has currently some very interesting artwork on view outside of the museum. Seward Johnson's 25 foot sculpture GOD BLESS AMERICA is inspired by the figures of Grant Wood's painting "American Gothic". A picture of this sculpture in a recent post of Dave Updegraff's blog, another photographer here in the Dubuque area, reminded me that I wanted to shoot this piece of art since I saw it the first time a little while ago. When I went there today, we had a nice thin layer of clouds covering up the sun. This made for really good, slightly diffused light and a gave a perfect background for this photo. I took only the SIGMA 10-20 mm out of my car and after a few minutes of shooting I had what I was looking for.


NIK Silver Efex Pro – next steps

I couldn't resist to browse through my archive and look for pictures that would make good B&W images. I really like how easy it is to use Silver Efex Pro. The presets on the left hand side provide good starting points for different styles you may want to apply.

Nik Silver Efex Pro - Screenshot

This photo was taken already in 2008 during a hike in Glacier National Park. The magic of this landscape is incredible and I believe this picture tells the story.

Glacier National Park
Nikon D200, Sigma 10-20mm, f4-5.6

NIK Silver Efex Pro - first trials

Mushroom
Nikon D200, Sigma 150mm/F2.8

Since quite some time I looked for ways to boost my B&W photography. Until now I used Adobe Lightroom for the conversion to B&W and for the tweaking of colors and tones. I believe some progress was made during the last couple years but I'm still not satisfied with some of the results. Many other photographers rave about NIK's Silver Efex Pro. I gave it a trial a little while ago (they have a 30 days trial version), and finally bought the software. I really liked it from the first moment on. The user interface is intuitive and you can find many good video tutorials on their website.

The image above was made on a sunny day earlier this month. We had snow on the ground and this mushroom on a fallen log caught my attention. Used a little fill flash for the shadows. I selected this shot for one of the first tests with Silver Efex Pro because it has many tonal values spread spread over the entire image.

DIY project: Speedlight Mounted Softbox

I like to shoot wildlife pictures in my backyard or even on the balcony. We live in the woods and we see birds or other animals all year long. Especially in the winter, enhancing the color by using subtle fill flash makes sense. Famous wildlife photographer Moose Peterson uses a softbox for the same purpose on his balcony, and I actually learned about it on his blog. So, why not just do the same?

I began making plans to build my own softbox when I saw Larry Becker's very detailed tutorial on his blog "Larry Becker's Cheap Shots". This was exactly what I was looking for. He made his for the Nikon SB600 speedlight, the same that I use. I like to create things on my own but I'm all against inventing the wheel twice.

Softbox

And here it is! I didn't change much. Found a nice guy in a sign shop here in town, who gave me a strip of black Coroplast for a few bucks that I used for the body of the softbox. At the moment I'm using a white report cover as a diffuser but I believe it swallows too much light. I will replace it as soon I find the frosted material that is a little more transparent. I didn't have gaffers tape, as recommended by Larry, but I used black vinyl electrical tape instead to cover all edges.

Tufted Titmouse

How does it work? First I did some indoor tests . The shadows turned out very soft, much better than with the bare flash. Last weekend I did some more testing on the balcony. It was bitter cold but that didn't reduce the fun I had waiting for birds and grey squirrels. The morning sun came very bright from the left hand side. The speedlight with the softbox mounted stood three feet to the right, 30 degrees tilted down, and pointing toward the bird bath. I had several good shots of the Tufted Titmouse and other birds. I liked this one in particular, because of how the flash made the trails of the water drops and the rising steam from the bird bath visible.

Grey Squirrel

Exposing for the shadows on the right side of the Grey Squirrel would have blown out the highlights. The soft fill flash took care of that and without the flash being too obvious.

The softbox is very lightweight, folds flat, and fits easily in the computer pocket of my photo back pack. Taking it in the field will not be a big deal. Because it is my first softbox, more testing needs to be done but I already like what it does for my photography on the balcony. Check it out at "Larry Becker's Cheap Shots". He has more really good tips on inexpensive photography solutions. Thank you for this one, Larry!

August 2013: More images made with the softbox: Click HERE and HERE

December 2011: New post "Softbox out again", see HERE